Table of contents
- Introduction
- Automation stack for GNOME Applications
- What do we use? Automation API - dogtail
- How are we dealing with automation on Wayland? The gnome-ponytail-daemon
- Giving the API a structure to be used in automation - behave
- The automation suite result page in form of behave-html-pretty-formatter project
- Filling all the gaps and providing useful tools with the qecore project
- GNOME Terminal Full Project Example
- Examples
- Comparison of OpenQA vs Accessibility
- Usage with GTK4
- Usage with Fedora 39 and newer.
- Reason for this article
- Future Plans/Aspirations -> GNOMEAutomation
- Finally
- Keywords
- Sources
Introduction
Hello and welcome.
My name is Michal, and I’m a Quality Engineer in Red Hat. I’ve been in Red Hat for over 7 years now and my responsibility is to write, maintain and improve an automation stack for GNOME Applications on RHEL while also having a responsibility for specific components and their automation suites, like gnome-control-center, gnome-terminal, gnome-shell, evolution and more.
In this article I will show and explain how our team (DeskopQE) uses Accessibility to automate and test GNOME Applications.
I will explain in great detail what we are using, how are we using it, how to do basic setup and execution of a testing suite. After reading this article you will have enough information to successfully start gnome-terminal automation suite on Fedora 38 with Wayland.
Please keep in mind that nobody is perfect, and we are no exception. If you see anything that we are doing wrong, let us know. We love to learn and welcome any feedback that would improve our automation suites.
Automation stack for GNOME Applications
First, let’s go over individual parts of our automation stack that we use.
What do we use? Automation API - dogtail
We use Assistive Technology - Service Provider Interface (AT-SPI) which is a set of interfaces that allow access technologies, such as screen readers, to programmatically determine what is being displayed on the screen and simulate keyboard and mouse events. It can be also used for automated testing.
To do this, we utilize Python module GObject introspection that holds Python bindings and support for GTK toolkit and GNOME applications, namely Atspi module.
from gi.repository import Atspi
We are using the dogtail project as an API for all we do. The reality of things is that the dogtail is a wrapper over Atspi and pyatspi2 (which is a wrapper over Atspi itself). There are some parts that are implemented only in dogtail project for ease of use, but if we take out dogtail and pyatspi2, everything can work only with Atspi module with some modifications.
    ┌──────────────────────────────────┐
    │         ┌──────────────────────┐ │
    │         │          ┌────────┐  │ │
    │ dogtail │ pyatspi2 │ AT-SPI │  │ │
    │         │          └────────┘  │ │
    │         └──────────────────────┘ │
    └──────────────────────────────────┘
Below you can see a simple example of how we interact with applications, provided you have a running session, the accessibility toolkit is enabled, and you are using Xorg. To make this example fully functional with Wayland, you will need information from the next section. This example will open overview, start gnome-terminal and execute a command:
#!/usr/bin/python3
from dogtail.tree import root
from dogtail.rawinput import typeText, pressKey
from time import sleep

# First open the application.
pressKey("Super") # Open overview.
sleep(1) # Give overview a little time to show.

typeText("Terminal") # Search application.
pressKey("Enter") # Confirm by Enter.

sleep(1) # Give the application a little time to start.

# Load application root to variable.
app = root.application("gnome-terminal-server") # Save root object.

# Search the application tree for objects.
app.child("Terminal", "terminal").click(3) # Right click in the middle of the terminal.

sleep(1) # Give application a little time to open the menu.

# Find the item Show Menubar, that is showing on the screen.
show_menubar = app.findChild(
    lambda x: x.name == "Show Menubar"
    and x.roleName == "check menu item"
    and x.showing
)
# If the Show Menubar is not checked, click it.
if not show_menubar.checked:
    show_menubar.click()
else:
    # Close the menu if the Menubar is already checked.
    pressKey("Esc")

sleep(1) # Give the application a little time to close the menu.

app.child("File", "menu").click() # Find File menu and click.
app.child("New Tab", "menu").click() # Find New Tab menu and click.
app.findChild(lambda x: "1." in x.name).click() # Confirm the profile.

sleep(1) # Give the terminal a little time to open the New Tab.

# Execute the command.
typeText("echo Hello World") # Type the command to terminal.
pressKey("Enter") # Confirm the command.
With these basic queries we can do quite a lot.
How are we dealing with automation on Wayland? The gnome-ponytail-daemon
While the example provided above will work for Xorg. For Wayland there is an extra step we need to do in order to successfully navigate the application via correct coordinates.
With Wayland, there is no translation of window coordinates to desktop coordinates. Meaning that if we have a button in the top left corner of the application and the application is in the middle of the screen, the click itself will be translated to the top left corner of the screen and not into the application window. Therefore, missing the click and failing the step.
Fortunately we have a solution in the form of a gnome-ponytail-daemon. This project was written by Olivier Fourdan @ofourdan and was based on gnome-remote-desktop written by Jonas Adahl @jadahl. I would also like to mention a new developer that recently joined our team José Expósito @jexposit who already contributed to the gnome-ponytail-daemon project. Changes are communicated to us after which we can verify the function with our suites. Since we depend on gnome-ponytail-daemon for translation of coordinates, any issue will show quickly.
With GNOME on Wayland we have screencasts and remote desktop APIs that can be used for controlling the keyboard and cursor. Wayland does not expose desktop coordinates and the usual process will return window coordinates of the various application widgets, which is where the RecordWindow method from screencast can be used, as it will translate global coordinates into surface relative coordinates.
To record any given window, there is a need to identify such window, for this we use window-list API. The Introspect D-BUS API in mutter provides a way to list all toplevel windows.
Functions from this project that connect a window and do actions in it for automation are integrated in dogtail project to be used seamlessly without any required user setup. So in effect, everything between Xorg and Wayland on our automation side is exactly the same and functions are handled differently on the dogtail side.
There are of course some shortcomings. In rare cases we need to test a feature that dogtail does not have a function for, the user needs to manually change window connection, but such cases are rare enough that examples for these cases fall out of the scope of this article.
If there would be a need for a very specific test case, the dogtail and ponytail can be used in unusual ways (read: hacked around).
With enough knowledge about the system and how these APIs work, a lot of things can be done even if they are not provided as methods and functions.
We have years of experience in this. Accessibility is not always in the state we would like it to be in, but we can work around issues most of the time.
I will show how to build and use ponytail in the GNOME Terminal Full Project Example section.
The ponytail project repository is located here gnome-ponytail-daemon
You will notice that in the project is an example how to use gnome-ponytail-daemon for automation without a dogtail API. The ponytail API is used by dogtail when required.
Giving the API a structure to be used in automation - behave
So now we have explained what APIs we use at the base level. Now we need some structure to use this and have the code base scalable. We use behave and its file structure as our automation structure.
While the behave structure is very simple:
    features
    ├── environment.py
    ├── main.feature
    └── steps
        └── steps.py
We need some extra parts for our use cases and improvement of readability:
    gnome-terminal # automation project - component name
    ├── features # behave main directory
    |   ├── environment.py # behave environment file
    |   ├── scenarios # folder to have our scenarios in
    |   |    ├── general.feature # specific scenarios
    |   |    └── example.feature # specific scenarios
    |   └── steps # behave steps directory containing implementation of scenarios, can have multiple files
    |       └── steps.py # steps implementation
    ├── behave.ini # behave configuration file which we use to adjust our formatter behave module
    ├── mapper.yaml # DesktopQE specific file for our CI
    └── runtest.sh # main script that does some basic setup, scenario start and reporting result to our CI
The feature files have following contents:
# -- FILE: features/scenarios/example.feature
Feature: Showing off behave

  @showing_off_behave
  Scenario: Run a simple test
    Given we have behave installed
    When we implement 5 tests
    Then behave will test them for us!
The steps.py file contents are as follows:
# -- FILE: features/steps/steps.py
from behave import given, when, then, step

@given('we have behave installed')
def step_impl(context):
    pass

@when('we implement {number:d} tests')
def step_impl(context, number):  # -- NOTE: number is converted into integer
    assert number > 1 or number == 0
    context.tests_count = number

@then('behave will test them for us!')
def step_impl(context):
    assert context.failed is False
    assert context.tests_count >= 0

@step('Dummy Step')
def dummy_step(context):
    pass
To better visualize the structure of behave's .feature files. Single Feature file can contain multiple Scenarios and each Scenario contains Steps that are implemented in steps.py file that is located in steps directory:
┌───────────────────────────────────────────────────────────────────────────────────┐
│         ┌────────────────────────────────┐ ┌────────────────────────────────┐     │
│         │          ┌──────┐ ┌──────┐     │ │          ┌──────┐ ┌──────┐     │     │
│ Feature │ Scenario │ Step │ │ Step │ ... │ │ Scenario │ Step │ │ Step │ ... │ ... │
│         │          └──────┘ └──────┘     │ │          └──────┘ └──────┘     │     │
│         └────────────────────────────────┘ └────────────────────────────────┘     │
└───────────────────────────────────────────────────────────────────────────────────┘
Now we can run behave:
$ behave
Feature: Showing off behave # features/example.feature:2

  Scenario: Run a simple test          # features/example.feature:5
    Given we have behave installed     # features/steps/example_steps.py:4
    When we implement 5 tests          # features/steps/example_steps.py:8
    Then behave will test them for us! # features/steps/example_steps.py:13

1 feature passed, 0 failed, 0 skipped
1 scenario passed, 0 failed, 0 skipped
3 steps passed, 0 failed, 0 skipped, 0 undefined
The behave run was a success, now we can use behave to run all of our test cases with ease.
For all of our test cases, we are using tags to differentiate between different scenarios.
So while $ behave will start every single scenario defined in feature files, our best practice is to start test cases one by one and separate them into their own result pages, which I will get into later.
We are running behave like this $ behave -kt showing_off_behave. The -k (note that in development version of behave v1.2.7.dev# this is available as --no-skipped, in the current pypi version 1.2.6 -k is still working) will skip all unexecuted tests, so they are not printed in summary and -t will match the tag in feature file and will start that one specific scenario. One tag can be used any number of times, so we can mark the whole scenario with one tag and start the execution that will run multiple tests.
For the example bellow, we can start specific test by $ behave -kt dummy_1 or run them both as $ behave -kt dummy. Of course if we have only those 2, the equivalent command is $ behave. If there are many more tests, we do not want to duplicate the tag too many times, therefore we can tag the entire feature file and start all scenarios in given feature file as $ behave -kt dummy_feature.
To use finer execution of a few tests from a larger set, you can execute the behave with a list of tags $ behave -k --tags="dummy_1,dummy_2".
Note that instead of Given, When, Then, And and But we can use asterisk * to prefix all steps in feature files. We use asterisk in most cases.
@dummy_feature
Feature: Dummy Feature

  @dummy
  @dummy_1
  Scenario: Dummy Scenario
    * Dummy Step

  @dummy
  @dummy_2
  Scenario: Dummy Scenario
    * Dummy Step
I have mentioned separating test scenarios executed to their own result pages. That is what the project behave-html-pretty-formatter is for.
The automation suite result page in form of behave-html-pretty-formatter project
The result of the behave run you saw above is given to the console in a pretty format, which is the Standard colourised pretty formatter. The behave has quite a lot of formatters to use. These formatters are built-in and can be chosen from to get the resulted data in a lot of formats ready to be used for various purposes.
Unfortunately, none of them are really useful to the extent of what we need in terms of reporting the result and debugging if something goes wrong.
New formatter can be added as a module to the behave. We provide the formatter as a Python module available from pypi behave-html-pretty-formatter
All that remains is to connect the module to the behave so that behave can use the new formatter. And this is done in the behave.ini file you saw in our project structure. Once the behave.ini file has the configuration of the behave-html-pretty-formatter, it will be seen by behave and can now be used when running the behave.
This is the behave.ini file you will see in the gnome-terminal automation example:
# -- FILE: behave.ini
# Define ALIAS for PrettyHTMLFormatter.
[behave.formatters]
html-pretty = behave_html_pretty_formatter:PrettyHTMLFormatter

# Optional configuration of PrettyHTMLFormatter
# also possible to use "behave ... -D behave.formatter.html-pretty.{setting}={value}".
[behave.userdata]
behave.formatter.html-pretty.title_string = GNOME Terminal Test Suite
# Example usecase, print {before/after}_scenarios as steps with attached data.
behave.formatter.html-pretty.pseudo_steps = false
# Structure of the result html page readable(pretty) or condensed.
behave.formatter.html-pretty.pretty_output = true
# The '%' must be escaped in ini format.
behave.formatter.html-pretty.date_format = %%d-%%m-%%Y %%H:%%M:%%S (%%s)
# Defines if the summary is expanded upon start.
behave.formatter.html-pretty.show_summary = false
# Defines if the user is interested in what steps are not executed.
behave.formatter.html-pretty.show_unexecuted_steps = true
# Define what to collapse by default, possible values:
#  "auto" - show everything except embeds (default)
#  "all" - hide everything
#  comma separated list - specify subset of "scenario,embed,table,text"
#  "none" - show everything, even embeds
behave.formatter.html-pretty.collapse = auto
# Defines if the user wants to see previous attempts when using auto retry.
# Auto retry https://github.com/behave/behave/blob/main/behave/contrib/scenario_autoretry.py
behave.formatter.html-pretty.show_retry_attempts = true
# Override global summary visibility
#  "auto" - show global summary if more than one feature executed (default)
#  "true" - show global summary
#  "false" - hide global summary
behave.formatter.html-pretty.global_summary = auto
That run will be now executed as $ behave -kt dummy -f html-pretty -o test.html. This will change the formatter from the default pretty to the html-pretty that will take the data from behave, transform them and generate self-contained HTML page to the output file test.html. Our test result files are named after the test case that was executed but omitted here for simplicity.
We made the new formatter html-pretty quite recently (January 2023) to improve the older html formatter. The new html-pretty formatter is coded in a very different way and can be more easily enriched with new features. It is also, in our opinion, much cleaner and simpler, while allowing us to have more data available to us. Output of this project allows us to have a self-contained HTML page so that the test results are always in this single file with CSS and JS. The page contains a lot of information. It prints each step and provides data if something goes wrong.
Although the formatter supports quite a lot of use cases e.g. compression of data, clickable links, images, videos and text logs, the data has to be somehow generated and injected into the formatter. The how is going to be addressed in the next section.
You can see example pages in the Examples section below.
Now, we have our APIs, a project structure for our automation, and we also have a self-contained HTML page that will contain full result of the single test, multiple tests or even entire features.
The project page can be found here behave-html-pretty-formatter
We can start the automating at this point. Although for the purpose of a general automation that will be very hard, as you would start from scratch and I imagine you would like to have much more that what is presented. Which is where qecore comes in.
Filling all the gaps and providing useful tools with the qecore project
The qecore project is a library of tools and commonly used functions that are required throughout our entire automation stack.
The project page can be found here qecore.
I have started to develop qecore only a few years back, so this project is relatively new and is being continuously developed and improved with new features and is indispensable for our day-to-day use when working with GNOME Applications.
-
Starting new session
Let us start with another part of our automation stack that cannot be left out and is the key to every single test (or at least most of them). While we have everything needed, there are situations where the session or application will freeze or otherwise will become unusable. We would like to do everything in one session but from our experience, this is, in most cases, not ideal or straight up not feasible.
So we need to restart the session on command and start a new one in a moments notice, while not interrupting the test suite run. This is provided by
qecorein the form of a scriptqecore-headless.The naming of the script is purely historical, it comes from the time we were running our suites on headless systems with dummy drivers. Currently, it serves as our session configuration tool. We run every single test in a new session, meaning that the test starts, the new GDM session is started, the test is executed, report results and GDM session is stopped. That way the next test will start with new session and no cleanup is required (although if
qecoreis set up correctly it will do the cleanup in the session and enable multiple runs in single session).The
qecore-headlessscript provides much more than that though:- Enables accessibility toolkit
- It changes GDM custom.conf configuration to autologin
testuser without password so that the GDM login page is not in the way - It loads the environment variables from process
gnome-session-binary. More specifically we look in the/proc/<pid>/environtake all values, add our own, and inject them to theos.environof thebehaveso that our tests act as if they are running from the session itself. With this we can fool the system most of the time but there are cases where it is not enough, although the workarounds are simple. - It configures user session in sense that you can choose if you would like to start Xorg or Wayland:
qecore-headless --session-type xorgqecore-headless --session-type wayland
- It is able to configure user desktop, namely GNOME or GNOME Classic
qecore-headless --session-desktop gnomeqecore-headless --session-desktop gnome-classic
- It makes sure the restart is done cleanly by checking
logind - It sets up other configuration to allow you to figure out system issues, like issue of
accessibility toolkitturning off - It will adapt
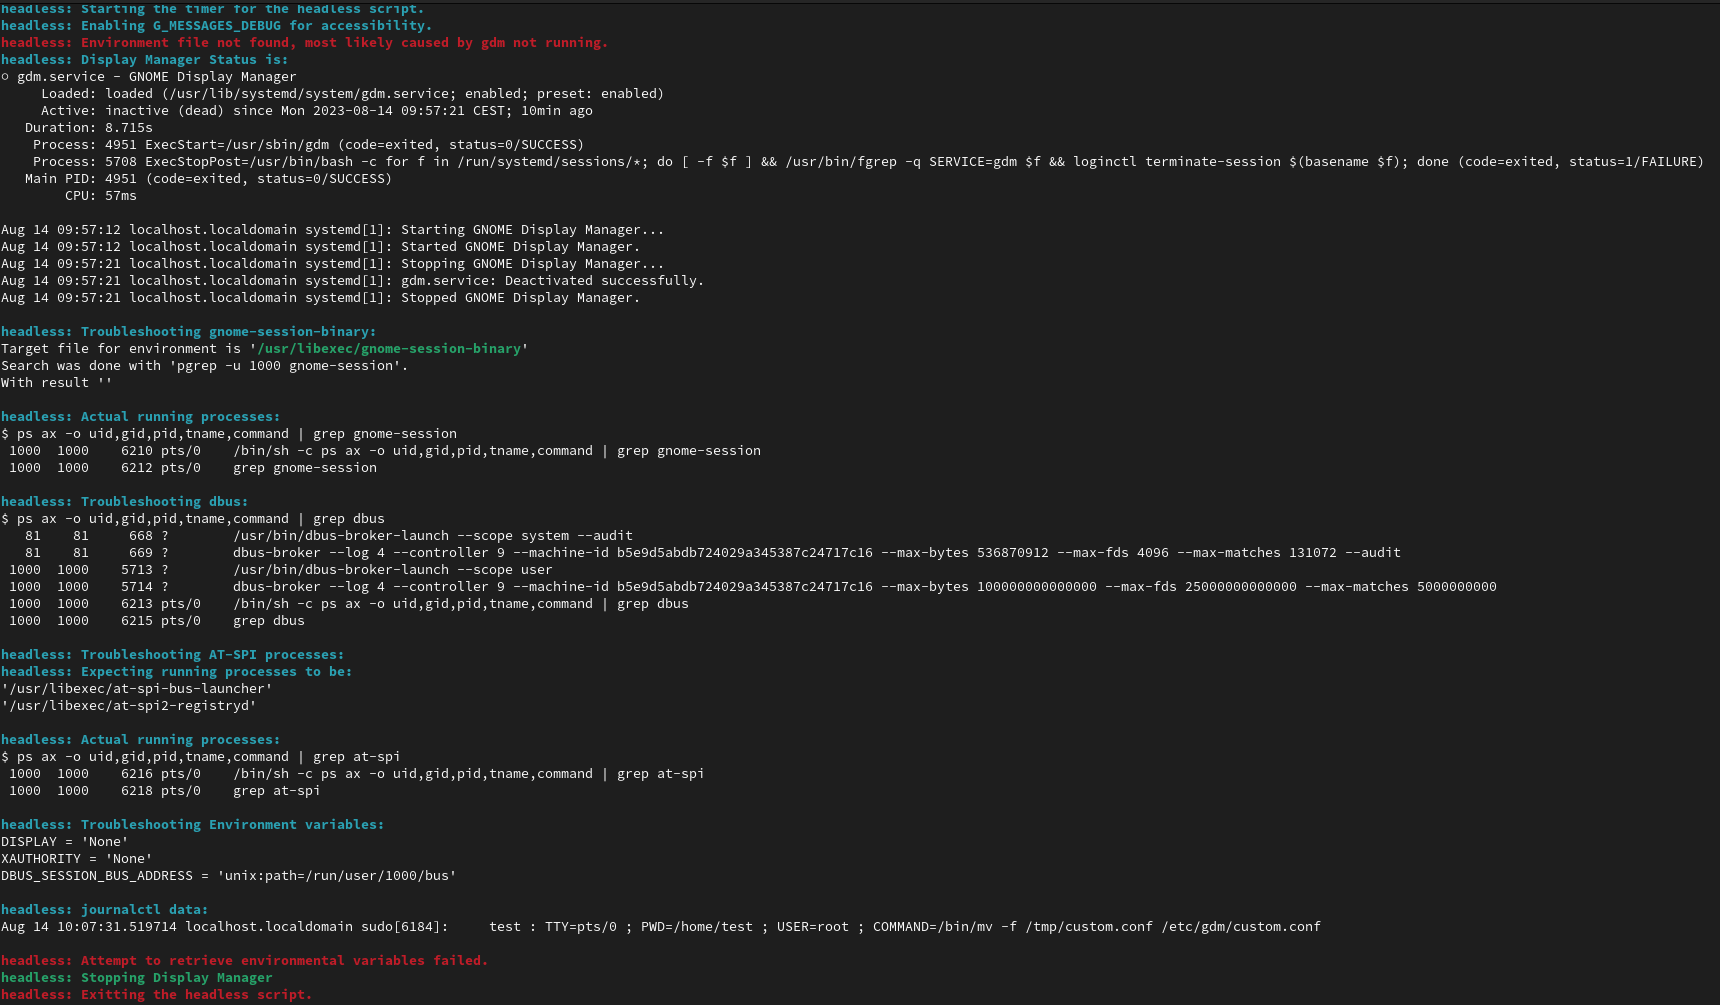
gsettingsvalues which we use most of the time and can sometime be annoying to deal with by hand - It does extensive troubleshooting when the GDM start fails (The qecore-headless troubleshooting) In the example you will not see anything wrong, I forced the error by stopping the GDM before the verification section got executed.
- It can enforce session type, meaning it will check the system configuration and running session and will fail on mismatch
- It provides
--keep <int>parameter, enabling to use one session for multiple tests. For exampleqecore-headless --keep 5 "behave -kt <test_name>"will make sure it runs 5 tests before restarting the session. - I am testing this script on RHEL8/9, Fedoras from version 35 to rawhide and on multiple architectures namely
x86_64,ppc64le,aarch64ands390x. It works on these architectures and systems out of the box.
All in all, this is a base script we run before we start to do anything. The
qecore-headlessis a script that executes another script. In the line above it startedbehave -kt <test_name>. If it does not get any parameter thebashis the default script. Which is what we want on our machines where we test by hand. We start the script and after that we only work with behave. While from time to time restarting the session simply byCtrl+Dorexitand starting newqecore-headless. Very convenient and easy to use.[test@localhost]$ qecore-headless headless: Colors enabled. headless: Starting the timer for the headless script. headless: Enabling G_MESSAGES_DEBUG for accessibility. headless: Starting Display Manager headless: Setting environment variable TERM as 'xterm' headless: Running 'xorg' with desktop 'gnome' headless: Setting DISPLAY variable to ':0'. headless: Started the script with PID 3449. [test@localhost]$ exit headless: The user script finished with return code 0. headless: Stopping Display Manager headless: The headless script ran for 10.15 seconds. [test@localhost]$ -
TestSandbox configuration
We start the suite with some commonly used methods and functions.
This is done with the
qecoreclassTestSandboxthat we will use for everything. I will use examples from the projectgnome-terminalthat I will be introducing later in this article.The behave file
environment.pyhas a few defined functions thatbehavehas hooks for, which we can fill with logic that we need. So we are going to use thebefore_alland initialize ourTestSandboxclass and save it to the variablecontextwhich is a data structure of behave that can be used to save and transfer data throughout all the files during the behave run. We can define our variables incontext, so we named itcontext.sandbox. From this moment the sandbox class will be available in the Pythonbehavefiles, and we can start using oursandbox. I again omitted some parts for simplicity, the full example will have the entire structure.def before_all(context) -> None: """ This function will be run once in every 'behave' command called. """ context.sandbox = TestSandbox("gnome-terminal", context=context)The
TestSandboxclass has been initialized, and initial attributes have been set, this will control everything and can be used with great degree of customization. There are some functions that will be also executed in this part:- Checking against
os.environwhich we use for custom runs for example- logging (verbose
qecoreexecution) - delete all cached files to be created anew (default is to keep the data between runs)
- to embed all data we have despite the test results (default behavior is to embed debug data only on failed runs to save space)
- enable backtrace generation from coredumps with debuginfo and debugsource installation (this takes a lot of time and space, so the default behavior is to skip backtrace fetching)
- enable other G_DEBUG options
- logging (verbose
- Some initial debugging and checks
- Initialization of default suite run
- Retrieve system data like architecture, distribution, display, session desktop and type. We need to differentiate based on these sometimes, so the
context.sandboxwill provide all the data for the suite. - The parameters of the class are the
nameof the test suite and thecontext, which is required to get the data from context toTestSandboxwhere we can manipulate it.
Now this is already quite a lot but the only thing that is needed by the user is to have the class initialized in the
environment.pyandTestSandboxwill do the rest. - Checking against
-
Application configuration
When executing any test suite, the user needs to identify an application that the suite will be using. For the purpose of automation of
gnome-terminalonFedorayou can see we need to define 3 applications. Thegnome-terminalitself, thepreferenceswhich from some version is inAtspias a standalone application andgnome-control-centernamed as settings.This allows seamless function of start/stop tests which will take the data from their respective
.desktopfiles and use it for its correct function.def before_all(context) -> None: """ This function will be run once in every 'behave' command called. """ context.sandbox = TestSandbox("gnome-terminal", context=context) context.terminal = context.sandbox.get_application( name="gnome-terminal", a11y_app_name="gnome-terminal-server", desktop_file_name="org.gnome.Terminal.desktop", ) context.terminal.exit_shortcut = "<Ctrl><Shift><Q>" context.preferences = context.sandbox.get_application( name="gnome-terminal", a11y_app_name="gnome-terminal-preferences", desktop_file_name="org.gnome.Terminal.Preferences.desktop", ) context.settings = context.sandbox.get_application( name="gnome-control-center", desktop_file_name="org.gnome.Settings.desktop" )From the example you can see that the
gnome-terminalapplication was saved to thecontext.terminalvariable. The method called was executed oncontext.sandboxwhich isget_application. This is required so thatsandboxcan keep the track of all applications defined so that it can do a proper cleanup after the suite ends.You can also see the parameters. All of them have their usage to properly identify the desktop file and its presence in
Atspitree. There are some minor debug prints on wrong usage to help new users identify issues. For example when you would not define thedesktop_file_nameforgnome-terminalyou would get following output prompting the user to specify the.desktopfile since from the data provided we were not able to decide what the user wanted to use:Environment error: before_all: More than one .desktop file found: /usr/share/applications/org.gnome.Terminal.Preferences.desktop /usr/share/applications/org.gnome.Terminal.desktop Specify one when initializing your application in environment.py, options are: 1) Specify your <name>.desktop file name 'desktop_file_name="<name>"'. 2) Provide full path to your .desktop file 'desktop_file_path="/path/to/desktop/file"'. ' ... = context.sandbox.get_application(..., desktop_file_name="", desktop_file_path="")This concludes the
before_allfunction and this setup will most likely never change apart from.desktopfile changes, in such case you would need to do minor changes to parameters.In the full example you can also see try/except usage. That is for recovery. Some issues can be fixed while running. We also need a way to end gracefully so that our data is loaded to the HTML page and not thrown away in case of a problem.
-
Before Scenario
Now for the
behave'sbefore_scenariofunction that gets executed before each test, this is where most of the work will be done byqecore'ssandbox. But all the user needs to do is to call this method and that is all. Nothing more, nothing less.def before_scenario(context, scenario) -> None: """ This function will be run before every scenario in 'behave' command called. """ context.sandbox.before_scenario(context, scenario)To list off some things that the
before_scenariodoes:- Waiting until
gnome-shellbecomes responsive, there is no point to continue untilgnome-shellcan be found in theAtspitree - Also sets some attributes that can be used to manipulate the run
- Sets timers for current scenarios
- Closes welcome tour - we need to have empty session, so we can test
- Closes yelp if opened
- Closes initial setup if opened
- Sets blank screen to never - we have test cases that are idle for a long period of time, so we need the automatic lock to not apply here
- Sets up embedding for
behave-html-pretty-formatter- attaching data to the HTML logs - Makes preparations for asynchronous calls like timeout from the host machine
- Creates new keyring so that we are not bothered by polkit dialogs during the suite run
- Returning to the home workspace
- Starts the recording - this is priceless when debugging or reporting bugs. Video of the bug reproducer ready to go.
There is more, but a lot of them are not important in the context of this article
- Waiting until
-
After Scenario
The
behave'safter_scenariofunction works the same as the name implies. This method will get executed after every test. As with previous example, all the user needs to do is to call the single method and the job is done.def after_scenario(context, scenario) -> None: """ This function will be run after every scenario in 'behave' command called. """ context.sandbox.after_scenario(context, scenario)Again, to list off some things that are being done:
- Capturing the image on fail
- Stopping the video recording
- Cleanup, closing all started applications
- Injecting data to the
behave-html-pretty-formatter. Some of these are on-fail-only, but that can be changed insandboxafter the initialization inbefore_all:context.sandbox.attach_faf_on_pass = Truecontext.sandbox.attach_video_on_pass = Truecontext.sandbox.attach_journal_on_pass = Truecontext.sandbox.attach_screenshot_on_pass = True
You can see full
environment.pyin thegnome-terminalproject. -
To summarize all what the user needs to do for setup
context.sandbox = TestSandbox("<name>", context=context)context.<single_word_name> = context.sandbox.get_application(name="<name>")context.sandbox.before_scenario(context, scenario)context.sandbox.after_scenario(context, scenario)
Now your setup is done forever. These are the setup parts and once this is done for a project, it rarely changes. Setup for some of my components, that I am responsible for, did not change for years that I was working on them. There are situations in my suites where I have no defined application, so all I need for setup are just 3 lines.
-
Commonly used steps
In previous examples from
behaveusage, you saw that you can implement a function in python. Connect it withbehavedecorator@stepto the text in.featurefile.Over the years we have had many
stepimplementations and usage fromfeatures. Most of the time if I wanted to do something I had to code a Python function, mark it with a decorator and use that decorator in thefeature. Some of them were used in so many projects, I found myself reimplementing or copying the samestepover and over. So I decided to provide them to everyone and all they have to do is to keep the format so that thebehavecan match them.The location where you can see commonly used steps.
With
common_steps.pyfromqecore, all user has to do is the following:# -- FILE: features/steps/steps.py from qecore.common_steps import *In the following example, I did not have to implement any
stepsand I was able to successfully write and execute a test:@view_menu_show_menubar Scenario: View Menu Show Menubar * Left click "View" "menu" in "terminal" * Left click "Show Menubar" "check menu item" in "terminal" * Item "File" "menu" is not "showing" in "terminal" * Right click "Terminal" "terminal" in "terminal" * Left click "Show Menubar" "check menu item" in "terminal" * Item "File" "menu" is "showing" in "terminal"Apart from providing generic steps that can be used in every project, the intention was to also have a way for non-technical person to write English sentences and thus being able to write automated tests. It is not perfect and cannot be used for all cases generally, as there are situations where I just have to write a custom step, but even an inexperienced user should be able to write a very simple test without an extensive Python knowledge or even the project as a whole.
-
Common steps also come with the advantage of debugging on error
Let’s say the user is writing a test and makes a typo or uses a name or a role name of a widget incorrectly. There are quite a lot of ways how to debug such an issue. The most convenient one is not debugging at all and letting
qecoredo it for us:[test@localhost gnome-terminal]$ behave -kt file_menu_new_tab @terminal_menu_feature Feature: Terminal Menu Functionality # features/scenarios/6_menu.feature:2 Background: # features/scenarios/6_menu.feature:5 @file_menu_new_tab Scenario: Make a New Tab * Start application "terminal" via "command" * Make sure window is focused for wayland testing * Make sure Menubar is showing * Left click "Filee" "menu" in "terminal" Assertion Failed: Item was not found: descendant of [application | gnome-terminal-server]: child satisyfing a custom lambda function Items with name: 'Filee': None Items with roleName: 'menu': name: ''Edit'' roleName: 'menu' position: '(351, 182)' size: '(42, 27)' attribute: 'None' name: ''File'' roleName: 'menu' position: '(311, 182)' size: '(40, 27)' attribute: 'None' name: ''Help'' roleName: 'menu' position: '(577, 182)' size: '(47, 27)' attribute: 'None' name: ''Search'' roleName: 'menu' position: '(441, 182)' size: '(61, 27)' attribute: 'None' name: ''Terminal'' roleName: 'menu' position: '(502, 182)' size: '(75, 27)' attribute: 'None' name: ''View'' roleName: 'menu' position: '(393, 182)' size: '(48, 27)' attribute: 'None' * Left click "New Tab" "menu item" in "terminal" * Terminal has "2" tabsDebugging of this issue is very simple. If the
common stepfailed to match a name or a role name, which are required data fields, search the Application for these labels and print what is presented. We can clearly see that the typo was in the nameFileeand no such name exists in given Application tree. We can fix the typo and continue writing tests. -
Another provided functionality
The qecore project provides truly a lot for our day-to-day use. I cannot list and talk about everything as this article is already very long and more is to come. I would still like to list a few other features:
-
Flatpaks - just as we are able to load applications with
get_applicationwe also have a function to work with Flatpaksget_flatpak. -
Backtrace - once there is an issue with the core component (in this project it is
gnome-terminal) we are testing and a coredump is detected viacoredumpctl,qecorewill attempt to get backtrace fromgdbafter installing all available debuginfo and debugsource packages that thegdbwill say it needs. This needs to be toggled on as it takes quite a lot of time and space. The resulting backtrace is than attached to the report as can be seen in Backtrace from coredump Example. -
Logging - we have a continuous logging of
qecoreand what it does, our own tool can also have a bug. Once any test fails, its logging data are attached to the HTML report to make sureqecoredid not cause the mistake. We also can make sure theqecoreis working as intended at all times. This logging can be also directed to the console, so user will be able to see it in real time. You can try it in the provided project with$ LOGGING=true behave -kt start_via_command -
Image matching - from time to time there is a use case, where the accessibility is not working correctly, or the accessibility data is not there at all. For these situations we cannot do much, but we took an inspiration from OpenQA. In such cases we can identify widget and parts of the desktop simply with an image (
needle) and try to find that image in the screenshot we take. These functions will return coordinates to us, and we can click to the correct place. The qecore has an image matching section that can be imported and used. It also provides pre-coded steps that are used most of the time. For the times you need to adjust the execution, we provide theMatcherclass and its methods, so that you can build your custom functionality easily. For exact implementation and usage you can look in image matching
More features are being added frequently based on our need and ideas.
-
-
Summary for the qecore and why we need it
While all of this text seems like a lot, from the user point of view there is not much going on. All the user needs is:
- Install qecore (see the installation bellow).
- Make very simple setup once (see the
environment.pyfile).
From this point the users are provided with a lot of functions and methods that they do not have to code themselves:
- Provides functionality to restart session on all of our supported systems and architectures
- Populates our test result output logs with data like
Error MessagesScreenshotsVideosJournalBacktracesLinksandLogging - Provides a lot of simple steps that are ready to be used with built-in debugging on error
- Provides a way to write automated tests with image matching
GNOME Terminal Full Project Example
Now that I have covered everything our automation solution needs, let’s get to the setup and execution of the GNOME Terminal test suite on Fedora 38 with Wayland.
Basic machine setup required before any action
There are a few preparation steps our solution requires.
Since we have test suites that can be destructive to the system and/or change the system configuration, we do not start the automation on our local machines. We have local Virtual Machines with given distributions ready, and we connect to them via ssh. If anything goes wrong during development of the suite, we would break only the VM which can be fixed or snapshoted back and in case of an unrecoverable issue, we will still be fine since the VM’s only purpose was running the suites and setting up a new one is trivial.
This setup is generally handled by our CI, which is why when trying this you will have to do this setup once by hand.
-
Set up the Virtual Machine
First let’s get Fedora 38 ISO
Boot the Fedora ISO with your choice of virtualization tool (e.g. Virtual Machine Manager or Boxes), install it to the disk and find out the IP.
-
Let’s create a user named
testThere is a possibility that you won’t have the password of the users present on the booted ISO.
There will be a
liveuserwith sudo rights so let’s create the userteston the machine, give it a password to use withsshand sudo privileges to prevent any disruption during the automation execution:useradd test -G wheel echo 'password' | passwd test --stdin # An example password, create any you would like. echo 'test ALL=(ALL) NOPASSWD: ALL' >> /etc/sudoersMost likely the
sshdservice will not be enabled, which would produceConnection refusedfor the port 22, so you might need to start thesshdin the VM and enable it, so it will be started in the future as well.systemctl enable --now sshdNow there is the user
teston Fedora 38 VM with sudo privileges, letssshto the machine.ssh test@<vm_ip>On successful login we can start making suite preparations.
Installing, building and execution
Now we need to:
- Get our tools to your machine
- Clone the GNOME Terminal automation suite repository
- Start the automation.
It is important that following commands are executed with sudo if the command says so. Reason for this is consistency and not having to deal with permissions. There is also no benefit installing it in any other way. The user and automation will have full control of the machine, so we can test everything we are required to.
-
Install the API -
dogtailFirst lets start with the base API -
dogtail. You will soon find out dogtail project is not updated in thepypiand that we have our up-to-date version in a different repository as arpmpackage. I am also a bit confused at times as to where the most up-to-date version is of this project. In the future plans section I am proposing a solution.Fortunately we can still use
pipto install thedogtailstraight fromgitvia command:sudo dnf install python3-pip sudo python3 -m pip install git+https://gitlab.com/dogtail/dogtail@devel/wayland -
Build and Install the helper daemon for Wayland automation -
gnome-ponytail-daemonFor automation on Wayland we also need a helper daemon for
dogtail. Thegnome-ponytail-daemonsource code is in C, so we need to clone the project, build it and install it. It has a few dependencies that we will also get now:sudo dnf install meson gcc glib2-devel git clone https://gitlab.gnome.org/ofourdan/gnome-ponytail-daemon.git cd gnome-ponytail-daemon sudo meson setup build sudo ninja -C build sudo ninja -C build install cd # get back to the home directory.The steps are being taken to enable
gnome-ponytail-daemonon Fedora from official repositories. -
Install the DesktopQE’s automation tools -
qecoreInstalling
qecorewill take care of the rest. It has dependencies onbehaveandbehave-html-pretty-formatter, so it will pull everything it needs.# I cannot promise the future changes will not break anything. We are doing improvements, new features and bug fixes regularly. # Best practise is to fixate installed version and update the qecore when you are doing updates to automation suite so you can verify the new version still works. sudo python3 -m pip install qecore==3.24 -
Clone the GNOME Terminal test suite
I have prepared a GitHub repository with the contents of the GNOME Terminal test suite:
git clone https://github.com/modehnal/GNOMETerminalAutomation.git
cd GNOMETerminalAutomation
Now that we are in the project directory. Let’s start the first test to make sure everything is running smoothly. Start the
qecore-headlessas a usertest:sudo -u test qecore-headless --session-type waylandRemember that
qecore-headlesswill work out of the box on Fedora 38 so if you encounter any error, try to run theqecore-headlessscript one more time. Once there is one session restart, theqecore-headlessshould fix most of the issues and configure the machine for our automation.To verify all went well, you should see output that has these parts:
headless: Starting Display Manager # This will tell you that attempt to start GDM has happened. headless: Running 'wayland' with desktop 'gnome' # This will inform you that GDM has started and correct configuration is loaded. headless: Started the script with PID <INT> # This is the last line that will let you know you can continue the work. The PID belongs to the `bash` you are now in. -
Start of the automation suite
Now that you have running session, we can finally execute the automation. Let’s do the simplest test - start of the GNOME Terminal.
It will fail without
geditbut do not be alarmed.behave -kt start_via_commandYou will get the following error. I have left it there intentionally for demonstration, and we will fix it right away:
Environment error: before_all: Desktop file of application 'gedit' was not found.
Traceback (most recent call last):
  File "features/environment.py", line 41, in before_all
    context.gedit = context.sandbox.get_application(name="gedit")
                    ^^^^^^^^^^^^^^^^^^^^^^^^^^^^^^^^^^^^^^^^^^^^^
  File "/usr/local/lib/python3.11/site-packages/qecore/sandbox.py", line 577, in get_application
    new_application = Application(
                      ^^^^^^^^^^^^
  File "/usr/local/lib/python3.11/site-packages/qecore/application.py", line 102, in __init__
    self.get_desktop_file_data()
  File "/usr/local/lib/python3.11/site-packages/qecore/application.py", line 160, in get_desktop_file_data
    raise UserWarning(
UserWarning: Desktop file of application 'gedit' was not found.
This is letting you know that as a user you did some kind of mistake. An error in
environmentshould never be seen. Thesandboxis designed to run only if the environment is configured properly.For the error above, simply install
geditthat is used in some tests:sudo dnf install -y geditAnd run it again:
behave -kt start_via_commandYou should get the following output:
[test@localhost-live gnome-terminal]$ behave -kt start_via_command
Authorization required, but no authorization protocol specified

(behave:42653): dbind-WARNING **: 09:12:58.193: Could not open X display
No such key “introspect”
@general_feature
Feature: General Tests # features/scenarios/1_general.feature:2
Creating logfile at /tmp/dogtail-test/logs/behave_20231026-091258_debug ...
Clicking on [toggle button | ]
Mouse button 1 click at (49.5,16.0)

  @start_via_command
  Scenario: Start application via command.       # features/scenarios/1_general.feature:6
    * Start application "terminal" via "command" # ../../../../usr/local/lib/python3.11/site-packages/qecore/common_steps.py:216 0.496s

1 feature passed, 0 failed, 6 skipped
1 scenario passed, 0 failed, 95 skipped
1 step passed, 0 failed, 1062 skipped, 0 undefined
Took 0m0.496s
[test@localhost-live gnome-terminal]$
You can immediately see that the test has passed and everything went well. In your VM, you should also see the suite being executed.
You can see some data noise which we can ignore for now.
If anything went wrong let me know in the GitHub Issues but if you followed everything, it should work.
If you attempt to write new tests I imagine you will encounter some issues that you can fix yourself based on the error provided.
Now you can run any test that is present in
gnome-terminalproject. To see what tests are presented, you can look at themapper.yamlfile totestmappersection or browse thefeaturefiles and see whattagsare defined. Or you can simply run it all with$ behave
Errors you can encounter
-
ModuleNotFoundError: No module named ‘ponytail’
This error means installation part of the ponytail did not end well. You can fix it by hand with the following:
sudo mkdir /usr/local/lib/python3.11/site-packages/ponytail sudo cp /home/test/gnome-ponytail-daemon/ponytail/ponytail.py /usr/local/lib/python3.11/site-packages/ponytail/ -
AttributeError: ‘Ponytail’ object has no attribute ‘connected’
This error means the
gnome-ponytail-daemonis not running. Check if thegnome-ponytail-daemonprocess is running, it should be during a running session, but something can still happen. We have three solutions here:- You can either restart the session, which should fix it most of the time.
# Exit the headless script. 'Ctrl+D' or '$ exit' # Start it again. sudo -u test qecore-headless --session-type wayland - Or you can start it by hand. Although this should never be needed.
# You can either start the daemon from the installed location. /usr/local/libexec/gnome-ponytail-daemon & # Or by starting it from the build/src/ directory. cd /path/to/gnome-ponytail-daemon/build/src/ # Switch to the binary location. ./gnome-ponytail-daemon & # Start the script. cd - # Switch back to gnome-terminal directory. - This section is no longer valid. José found an issue that caused the gnome-ponytail-daemon to hang. Issue was fixed but kept here for visibility. There is also possibility that the running daemon is faulty (happened to me while testing this article). When you kill the running daemon a new one will start, and it will once again work.
# Find pid of the daemon.
ps ax | grep pony
sudo kill -9 <pid>
- You can either restart the session, which should fix it most of the time.
-
ConfigError: No steps directory in ‘/path/to/features’
The
behavesearches for a directoryfeaturesin your current directory. Make sure you are in a suite directory and this issue will not appear. -
Undefined decorator
Test will fail with step being colored
yellow, and it will give you the following hint:You can implement step definitions for undefined steps with these snippets: @given(u'undefined') def step_impl(context): raise NotImplementedError(u'STEP: Given undefined')This means your decorator line somewhere in your
.featurefiles is not being correctly matched to its implementation in yourstep.pyfile. Add theundefineddecorator to the steps.py file as hinted. -
SearchError: descendant of [application | gnome-terminal-server]: child with name=not_existing_name
You have tried search or do an action for a widget that is not present in the
gnome-terminalAccessibility tree. Make sure the search query uses correct data. -
ValueError: Attempting to generate a mouse event at negative coordinates: (-2147483647.5,-2147483647.5)
You have attempted to generate a mouse event in the widget that is not currently on the screen.
This is quite a common issue for us. Even if you think the widget is showing you can get this error. This usually means there are multiple nodes in the tree that fulfil your search query. You will need to specify your query with more detail.
-
Debugging other issues
Most of the issues you should encounter will be based on misunderstanding of the application tree structure. With practice this will be solved.
In the meantime, you will need a knowledge how to go through the Accessibility tree by hand and check different
Atspinodes attributes to improve your queries.Let’s use an interactive Python shell - ipython3:
sudo python3 -m pip install ipython # Install ipython3.
ipython3 # Run it.
In this interactive shell you will import the
dogtail'stree root on your own and save theAtspiroot ofgnome-terminalto a variable:# IPython In : from dogtail.tree import root In : app = root.application("gnome-terminal-server") In : app # Type 'app' and press Enter to see what this object is. Out: <Atspi.Accessible object ..>So now we have a
appnode which is anAtspiroot node of thegnome-terminalapplication.You can notice the application name I have made a query for is
gnome-terminal-server. You will recall that this is the name we need to provide in theenvironment.pyfile when defining the application since not every application name is equivalent to the name present in Accessibility tree:context.terminal = context.sandbox.get_application( name="gnome-terminal", a11y_app_name="gnome-terminal-server", desktop_file_name="org.gnome.Terminal.desktop", )To see all running applications on your system. Use the following:
# IPython
In : from dogtail.tree import root

In : [x.name for x in root.applications()]
Out:
['gnome-shell',
'gsd-media-keys',
'ibus-extension-gtk3',
'gsd-color',
'gsd-keyboard',
'gsd-power',
'gsd-wacom',
'evolution-alarm-notify',
'gsd-xsettings',
'ibus-x11',
'main.py',
'xdg-desktop-portal-gtk',
'gnome-terminal-server',
'ipython3']
Now let’s return to the
appAtspinode.You have a root, and you need to find out more about a button. Let’s say we have
Showing Menubarand want to click on theFilebutton.You do not know more about its attributes so let’s find out:
# IPython
In : from dogtail.tree import root

In : app = root.application("gnome-terminal-server")
In : f = app.child("File")
In : f.name
Out: 'File'

In : f.roleName
Out: 'menu'

In : f.position
Out: (26, 70)
# Notice that these are coordinates in the application.
# The gnome-ponytail-daemon does the translation for mouse events.

In : f.size
Out: (40, 27)

In : f.showing
Out: True

In : f.focused
Out: False
There are many more ways how to get the desired node in the tree. You can see the details for example in dogtail’s documentation which is unfortunately not up to date, but I was learning on this, so it is very much usable.
For function or methods you cannot find you can look in the dogtail’s project files.
You can also take the inspiration of the API in the provided
gnome-terminalproject. There should be enough examples of implementation to get you started.
The main queries you will be using
# Most common queries.
# Returns <Atspi.Accessible object ..>
<Atspi.Accessible object ..>.child(name="..", roleName="..")
# Used for finer queries and returns <Atspi.Accessible object ..>
<Atspi.Accessible object ..>.findChild(lambda x: x.name == "" and x.size == (0, 5) and x.showing)
# Used for finer queries that returns list of results [<Atspi.Accessible object ..>, ..]
<Atspi.Accessible object ..>.findChildren(lambda x: x.roleName == "" and x.position[0] >= 0 and x.focused)

# All nodes have the base methods defined. Most notably:
In : app.child("File").click()
Clicking on [menu | File]
Mouse button 1 click at (46.0,83.5)
# Note the coordinates of the click. The dogtail will calculate a center of the node from its position and size.

# Some nodes have actions defined.
In : app.child("File").actions
Out: {'click': <dogtail.tree.Action at 0x7f97d44b0210>}
# Which you can use instead of mouse or keyboard events in some cases.
In : app.child("File").doActionNamed("click")
click on [menu | File]
Out: True

# When working with text fields the appropriate Atspi nodes have attribute .text
<Atspi.Accessible object ..>.text = "Write a text to the text field."
# Beware that sometimes you will need to click to the text field or the .text attribute will not update.

# When working with scroll panes you can use .value attribute to scroll in the page.
scroll_pane = <Atspi.Accessible object ..>.child(name="..", roleName="scroll pane")
# Look at the value.
scroll_pane.value
# Look at min and max value.
scroll_pane.minValue
scroll_pane.maxValue

# Scroll the window - use value between min and max.
scroll_pane.value = <int/float>
# To simply scroll to the bottom you can use.
scroll_pane.value = scroll_pane.maxValue

# Beware that this is very dependant on the Accessibility in the application.
# It is not uncommon to have the minValue and maxValue to be both 0.0,
# in which case you will not be able to scroll this way.
With these you can do quite a lot.
Let’s say we do not care about a single button, we want to see the entire tree. Again we have multiple options.
We can use the <Atspi.Accessible object ..>.dump() method on nodes. This will return very simple tree representation from the node we are in.
Or you can use the <Atspi.Accessible object ..>.tree() method, which returns a proper tree like representation of the application. Let’s see how it looks for gnome-terminal. Note that the format of the Atspi nodes is as follows [<name>-<roleName>-<description>]. Format could be better to prevent confusion in the dash '-' character but for now it serves its purpose well.
A little disclaimer. Use with care on large trees like gnome-shell, it will take a very long time, this feature was not written with efficiency in mind. For large trees the dump() method is faster.
In : app.tree()
[gnome-terminal-server-application-]
  └── [test@localhost-live:~-frame-]
      ├── [-panel-]
      │    ├── [-filler-]
      │    │    ├── [-separator-]
      │    │    └── [Close-push button-]
      │    ├── [-push button-]
      │    ├── [Menu-toggle button-]
      │    ├── [-filler-]
      │    │    ├── [test@localhost-live:~-label-]
      │    │    └── [-label-]
      │    └── [-filler-]
      │         ├── [-push button-]
      │         └── [Menu-toggle button-]
      ├── [-filler-]
      │    ├── [-menu bar-]
      │    │    ├── [File-menu-]
      │    │    │    ├── [New Tab-menu item-]
      │    │    │    ├── [New Window-menu item-]
      │    │    │    ├── [-separator-]
      │    │    │    ├── [Close Tab-menu item-]
      │    │    │    └── [Close Window-menu item-]
      │    │    ├── [Edit-menu-]
      │    │    │    ├── [Copy-menu item-]
      │    │    │    ├── [Copy as HTML-menu item-]
      │    │    │    ├── [Paste-menu item-]
      │    │    │    ├── [-separator-]
      │    │    │    ├── [Select All-menu item-]
      │    │    │    ├── [-separator-]
      │    │    │    └── [Preferences-menu item-]
      │    │    ├── [View-menu-]
      │    │    │    ├── [Show Menubar-check menu item-]
      │    │    │    ├── [Full Screen-check menu item-]
      │    │    │    ├── [-separator-]
      │    │    │    ├── [Zoom In-menu item-]
      │    │    │    ├── [Normal Size-menu item-]
      │    │    │    └── [Zoom Out-menu item-]
      │    │    ├── [Search-menu-]
      │    │    │    ├── [Find…-menu item-]
      │    │    │    ├── [Find Next-menu item-]
      │    │    │    ├── [Find Previous-menu item-]
      │    │    │    └── [Clear Highlight-menu item-]
      │    │    ├── [Terminal-menu-]
      │    │    │    ├── [Set Title…-menu item-]
      │    │    │    ├── [-separator-]
      │    │    │    ├── [Read-Only-check menu item-]
      │    │    │    ├── [-separator-]
      │    │    │    ├── [Reset-menu item-]
      │    │    │    ├── [Reset and Clear-menu item-]
      │    │    │    ├── [-separator-]
      │    │    │    ├── [1. 80×24-menu item-]
      │    │    │    ├── [2. 80×43-menu item-]
      │    │    │    ├── [3. 132×24-menu item-]
      │    │    │    └── [4. 132×43-menu item-]
      │    │    └── [Help-menu-]
      │    │         ├── [Contents-menu item-]
      │    │         └── [About-menu item-]
      │    └── [-page tab list-]
      │         └── [-page tab-]
      │              └── [-panel-]
      │                   └── [-filler-]
      │                        ├── [Terminal-terminal-test@localhost-live:~]
      │                        └── [-scroll bar-]
      └── [-panel-]
            └── [-panel-]
                └── [-filler-]
                      └── [-filler-]
                          ├── [-filler-]
                          │    └── [-filler-]
                          │         ├── [Zoom Out-push button-]
                          │         ├── [100%-push button-]
                          │         └── [Zoom In-push button-]
                          ├── [-filler-]
                          │    └── [-filler-]
                          │         ├── [New Window-push button-]
                          │         └── [Full Screen-push button-]
                          ├── [-filler-]
                          │    ├── [-separator-]
                          │    └── [-filler-]
                          │         ├── [Read-Only-check box-]
                          │         ├── [Set Title…-push button-]
                          │         ├── [-filler-]
                          │         │    └── [-filler-]
                          │         └── [Advanced-push button-]
                          └── [-filler-]
                                ├── [-separator-]
                                └── [-filler-]
                                    ├── [Preferences-push button-]
                                    ├── [Help-push button-]
                                    └── [About-push button-]
We also have a Sniff or AT-SPI Browser that you can use to search for nodes. That is an application that comes with dogtail installation.
Lets exit the ipython3 since there is a lock in effect and Sniff will not/should not start when you are working with it in command line.
Once you open the Sniff you can see the applications opened and you can browse their content. For better visual presentation click on Actions -> Highlight Items. With Xorg this shows you the red squares correctly around the selected nodes, with Wayland this will be shown incorrectly. That is one of the reason why going through the tree via interactive shell is better. Once you get used to it, searching for your desired node is a matter of seconds.
Explaining the rest of the gnome-terminal project
-
The mapper.yaml
This file serves as an automation suite definition:
- It contains definition of the
gnome-terminalcomponent, what architectures it will run on and if it can run with Wayland - It lists dependencies with beaker task, so we can start appropriate machine setup
- Defines what HW we are running
- Setup and cleanup commands, which are empty in this project. Some setup from
runtest.shcould be here, but I am used to having it in theruntest.shfile. - And finally definition of all tests and how it will be fed to the
runtest.sh - Also marking a few tests as
gatetests, which is a subset of tests that are run for a new application version as a first indicator of application health
You do not see much else here as it is not needed. But we have a bit more options defined, for example:
- What directory is the script in
- What is the name of this script - it does not have to be named
runtest.sh - What architectures we can run this test on or which one we exclude
- What is the timeout of this test so that the machine can kill the execution after that
- Tagging for some other automation logic - like
gate - What extra packages to install for specific test
Most of the content in this file is not relevant to this article.
- It contains definition of the
-
The runtest.sh
This file is the main script that will be run in the machine, and you will see it do some logic I have explained.
The mapper.yaml will be parsed and each
testmapperitem will be executed for example as./runtest.sh start_via_commandbut still based on mapper definition.Detailed description:
- Set some variables for later
- Define set of non-repeating tests. We do not repeat tests that are known to fail for various reason like bugs or test instability.
- Set up the
opencv- provided as an example, this suite does not use opencv. - Setup
qecore- we do this here because not every project is usingqecorefor exampleNetworkManager. So we install qecore only in projects that require it. - Define different start for
x86_64and other architectures and define a number of fails the test can go through before we say it failed - List coredumpctl so that we know if the component coredumped. The test can pass, and the component can still generate coredump entry.
- Make the actual data upload to our CI since our HTML logs are self-contained with everything we need there is only one file uploaded
Examples
- Video example: Side by side of session with command line
- Video example: Click on System menu
- Video example: Open Terminal from Overview
- Video example: Scrolling the Terminal
- Video example: Open Activities, start Calculator and do a calculation
- Video example: Open Terminal open a New Tab, execute a command
- Test result: HTML page Full Report Example
- Test result: HTML page backtrace from coredump Example
Comparison of OpenQA vs Accessibility
While OpenQA is a good product for what it does, it is in my opinion not usable for GNOME Desktop Automation and not in the sense that it cannot be used, it can very well be used with some degree of difficulty. I have seen it being used testing anaconda and that is a perfect use case. It would be my choice as well for parts of the system where Atspi cannot be used.
As I mentioned, we are using the image matching in some capacity as well. From my experience the image matching is very fragile, the tests are difficult to maintain, and it is quite unscalable for our purposes. The few tests that I have written were a pain, and I am the one who introduced this feature to our team, so I can imagine others were even more frustrated with it. We have it in a good enough state today but on any UI change we have to redo the needles.
There were instances where I could not differentiate between new and old needle, to my eye it looked exactly the same, but the new needle started passing the test. It is quite a long process to write even a single test.
On the other hand with Atspi, if we see a failed test, most of the time it is a bug or the UI label or placement has changed. On bugs the issue is clear and there is nothing to be changed on the automation side. With UI change we check Screenshot or Video to see what happened, and usually we can fix the test very quickly by changing order of clicks or rewriting a string. Once the suite is written, it can be easily expanded with new test cases and maintained through different version releases. There are some issues we encounter when writing the tests that cause instability and that has to be accounted for but once the suite is tried and tested it is very stable.
For me personally these tools are way too different to be compared, but there is no question about difficulty of using opencv and comparing two images and working with Python objects. Working with objects will always be more stable.
There are a few other advantages that need to be mentioned.
- It does not matter what theme is in use.
- It does not matter what font is in displayed on the screen.
- It does not matter where on the screen the application is located.
- In GNOME Control Center we can enable Zoom, Large Text or Large Contrast, and it will not affect the automation.
Usage with GTK4
While what I have described here will work for GTK4 Applications, you will soon find that there are extra steps required.
There is a question of shadows. GTK4 applications have large shadows and that shadow left upper corner is the base (0, 0) of the application. So when you attempt to click, the click will be very much in the wrong place.
To fix this you can use the update_coords() method from dogtail.rawinput to offset (x, y) of the final coordinate.
I still hope I will be able to remove this method in the future and figure out the size of the shadows dynamically based on the application, so that the user is not forced to make manually offset for all clicks, although my recent experiments and research is proving me wrong.
This offset, while working with GTK4, will now cause the GTK3 applications actions to be in the wrong place and there is no reason for a suite to not work with both.
We are currently trying to figure out, with some level of success, how to make any differences between GTK3 and GTK4 irrelevant from the user point of view. So hopefully in the future there will be no need to have any offsets.
Usage with Fedora 39 and newer.
Please beware that this article is for Fedora 38. While it will work on 39 too, there are some design changes that the qecore is not yet adapted for. Like the Activities label missing which qecore currently uses for closing gnome-shell overview.
This suite will work on Fedora 39 and newer as is, but you will see some tests failing.
Update 2024 July 16: Automation will now work with no issues on newer Fedoras with qecore==3.26.1.
Reason for this article
There is another reason for this article apart from showcasing our solution.
While I want to present our solution and I can say that what we have is good, it is not perfect by a long shot and requires a lot of knowledge to get the automation running as I have demonstrated in this article, it can also quite quickly stop working.
All this work that went into making our tool sets is very dependent on Accessibility working, everything depends on and is built around Atspi. If Accessibility went away or would be broken, we would not be able to do as much as we can today. Currently, we can automate most of the GNOME Applications including gnome-shell since from the point of view of Accessibility, the gnome-shell is just another application.
This article aims to show how easy it is to get the automation of GNOME Applications off the ground. We hope, by providing the full gnome-terminal component automation example for anyone, a lot of people will try it out. We would love if people found it useful and would attempt to contribute to upstream projects with automation tests.
The most desired outcome would be to have more eyes on Accessibility. To provide justification and motivation for development of Accessibility and its ability to be used for automation.
Future Plans/Aspirations -> GNOMEAutomation
To be honest, there is no need to do any of the following things that I am listing. Currently, it works good enough as is. But it can be better, it can work better, there is always a way to improve what we have.
Qecore
The qecore project is currently serving as a library of tools that also serves as a glue layer across different parts of our solution. Qecore does a lot of stuff on its own but is still designed around the main projects:
Accessibility- the contents of the applications we testbehave- relying on its environment to start its main functions and contextual information holder that moves data across different partsdogtail- provides useful functions like search queries, clicking and key pressinggnome-ponytail-daemon- on Wayland this is a key project without which we cannot do muchbehave-html-pretty-formatter- standalone project thatqecorewill populate with data upon failure
Aspirations is to have a single project that covers everything that quality engineers need -> GNOMEAutomation.
Accessibility
If accessibility goes away we are going to be “attached to another object by an inclined plane wrapped helically around an axis”.
There are some issues that come from Atspi already, we are able to identify them on our end and can notify developers, but there is an issue. If developer wants to see it reproduced they would need quite a lot of setup and even if the setup is running they see dogtail/qecore errors, we currently have no easy way how to provide reproducers in Atspi that would allow them to see the issue and not waste their time with our environment. The constraint here is time.
We have a few issues that we could report and help developers identify and also help to fix it. But the problem is that developers have already a lot of stuff on their hands, our issues are not a priority, understandably. We also do not really have time to make difficult reproducers and debugging issues that we can bypass. We have quite a lot of responsibilities and there is only a finite time. The time we would spend on making reproducers is quite higher that the time we spend on making a workaround. Workarounds are doable in matter of minutes, and we bypass the issue altogether.
So unless there is a blocker, we usually opt to not report issues and work around them.
Aspirations:
If we introduce automation via accessibility to more people with a coherent project like GNOMEAutomation, that is not collection of projects spliced together to just work, we might have a wider audience and user base. That might help to attract talent to our teams that would help improve Accessibility and keep it in good state.
With a project like this we also might have a wider base for Fedora testing days. Some things already work on Fedora and are mostly usable. The issue is a long setup as you can see, that this project would hopefully solve. I would imagine that once a test day comes, we could have GitLab/GitHub repositories with our testing suites that I and others would contribute to, so that anyone can just come, download the project and run the tests. This would be quite rich source of data that user would not have to spend a lot of time on. Simply boot VM, run the suits, report results. There is of course a need for real HW testing as well, but that is not the issue we are trying to solve here. Currently, I try to participate in test days, but I am not able to fit it to my schedule every time, which is a shame.
The behave
Its file structure is the template of our project and all other things are going before or after the behave command line execution. Behave has limitations that we have to hack around sometimes to get our desired outcome. Those are rare, although we have a recent example.
We need to generate a log no matter what part fails, so that the end user can evaluate what went wrong. The problem starts when the very first function is called, before_all. Something can still go wrong, and we need to attach the data to the report. The problem is that behave, even if it was called as behave -f html-pretty, does not know about the formatter in the before_all function. So when we are dealing with an error in setup, we have no place to attach it to. We can bypass it by saving the error and evaluate any errors in the very next function before_scenario, end the run, and attach it to the report since behave now knows it has a formatter defined. This is solvable but quite inconvenient.
There are rare issues where the behave fails, and no logs are generated while we would love at least partial results. But since behave is the one who generates the output, if behave fails we have nothing to parse for our html-pretty output. Sometimes behave also captures errors, and we have to go for an adventure to see where the error was coming from since the error we get said nothing about the real issue. There are no blockers currently, just inconveniences that we would love not to deal with.
Aspiration is to not have behave dictate our structure, possibilities and output but having project that enables our wants/needs/requirements. But again, behave works perfectly fine in the majority of our cases - no reason to reimplement something that exists with small changes.
There is currently no proper reason to remove behave from our solution.
The dogtail API
This project serves as our API, it has its set of problems while it still works most the time.
Currently, there is no incentive to focus on reimplementation as what we now have works fine and most of our suites are written and are being adapted between package and system versions. There are situations where new feature or bug appears, and we include it in our suite, but that is using previously used functions, so there is nothing new from the testing point of view.
I am going to include personal experience when I first started working at Red Hat.
I was assigned a responsibility of a project gnome-contacts. The automation was already written, and I was required to understand the code, learn how to use it, modify it and improve it. At first, I was just copying around what was already there, and I had no issues making it work. Until I encountered a strange artifact, function not working. It was the same as any other function used in the code. I had no idea why it was not working. I found dogtail source code and went through it and I saw nothing wrong. No one was able to help me as they did not see anything wrong on the dogtail side either. So I marked the test as broken or simply worked around it, I do not remember. It was quite a while before I realized the dogtail is not a full API but a wrapper and extension of others. So I started looking for the other libraries imported in dogtail, in pyatspi2 and finally Atspi. I found a documentation that I do not believe was up-to-date, but it was usable. I found the C source code. Furthermore, I went through it to verify missing documentation parts. I still do not know the exact source code and documentation, I might have been looking at the wrong place altogether. Most of the stuff I tried that I know are or are not working, is a result of experimentation. As I mentioned there is not much time, so trial and error was the chosen solution. I started making reproducer in Atspi, only to find I am able to reproduce the issue I had in the past quite a lot and always thought the dogtail was not working.
The point is that the issue that was in the code for years was not identified because no one knew where to look. I had no one to teach me where to look or to say that the problem might be somewhere else, because it was poorly documented, and I did not find any tutorials how to debug such issues.
Aspirations is to improve dogtail, but not in that project - an alternative to dogtail. Dogtail is implementing its own functions, it wraps over pyatpsi2 and Atspi, while pyatspi2 also wraps over Atspi, so debugging is a problem.
To make sure problems are in the Atspi library, I had no other option than to make lightweight clone of dogtail and not wrapping over anything other than Atspi. I did the bare minimum to make the API work and to verify some specific issue was having a source in Atspi. It was a success. I saw the same issues without any use of dogtail and pyatspi2.
The GNOMEAutomation would provide API just like dogtail, but wrapping only over Atspi so any issue that is found will have a single source. The best case scenario would be pointing developers to the API and have them see that we are using the Atspi functions, so it cannot be an issue we introduced. They will also get a reproducer directly to the Atspi and will not have to deal with our environment. In the worst case, installing GNOMEAutomation with a given project it was reproduced in, which would be start-able right away without any difficult setup. Documentation will be present from the start (I have a habit to have docstring and proper documentations everywhere) so no one will need to go on long searches to figure out what is wrong and where.
Update 2024 July 16: We have agreed to make required changes in dogtail project and rewrite is in progress https://gitlab.com/dogtail/dogtail/-/issues/29.
The gnome-ponytail-daemon
I would imagine there is a way how to include it in this project, so any issue can be tracked accordingly.
This project was originally created to enable us to continue working on Wayland. It’s hard to imagine anyone but us using gnome-ponytail-daemon, but I could be proven wrong.
The behave-html-pretty-formatter
The formatter was required to be written in a way to fit in our current solution. It had to be done as a standalone project. Which on its own is just bare bones so that it also can be used by upstream (we were pleasantly surprised how many people are using it already). We are still generating the data with qecore.
Projects like GNOMEAutomation would include an output generator which behave-html-pretty-formatter would fulfil beautifully or with some minor changes. I always imagined that we could have a self-contained suite output wrapped over the entire stack, which is currently not feasible. That said, having it over the behave part is good enough.
An Aspiration is to have logs and reports over the entire automation stack.
Finally
Hopefully information contained here were useful to you.
We would love to know, how many people will actually attempt to execute GNOME Terminal test suite.
If you follow the setup here and succeed, please consider Staring the GNOMETerminalAutomation project on GitHub. It will help us in two ways. One is to see how many people got this far and two is making this project more visible.
If you would fail for any reason, please open an Issue on GitHub so that I can fix something I might have missed or to help you fix something I did not think about.
Thank you for reading.
Keywords
Accessibility, AT-SPI, a11y, GNOME, Fedora, Wayland, automation, suite, test, gnome-terminal, Atspi, pyatspi2, dogtail, gnome-ponytail-daemon, behave, qecore, behave-html-pretty-formatter
Sources
- http://lazka.github.io/pgi-docs/#Atspi-2.0
- https://github.com/behave/behave
- https://gitlab.com/dogtail/qecore
- https://gitlab.com/dogtail/dogtail
- https://gitlab.gnome.org/ofourdan/gnome-ponytail-daemon
- https://github.com/behave-contrib/behave-html-pretty-formatter
- https://fedorapeople.org/~vhumpa/dogtail/epydoc/
- https://github.com/modehnal/GNOMETerminalAutomation